Okay, so my June project wasn't of the creative variety, but it did require hope that all would work out in the end!
So it being June now, I decided it was time to make the final clothing swap in the closet. Out with the sweaters and in with the capris! It was long-overdue, but life has been a bit crazy with the change of jobs. Nowadays I rarely wear anything other than scrubs during the weekdays (except PJ's). Thankfully the new job outside of the hospital means that my scrubs don't feel gross after working all day. So I rarely change clothes after work. Yay for less laundry!
Anywhoo, I'm getting off track.
All that to say... I've been slow to pull out my summer clothes. And to my horror, I discovered a favorite t-shirt and a favorite blouse BOTH had an unmissable oil stain on the front. The blouse was one that had been packed away since last fall! So, as I have grown accustomed to doing, I checked Pinterest and found a method to try. Honestly, I was doubtful, but I had a enough hope to give it a try. And boy, am I glad I did!
I had totally planned to take before and after photos and document my success (or failure) here, but in my excitement, I completely forgot! So you'll just have to trust me!
Follow the link above for the detailed instructions. But the gist is that you use WD-40, baking soda, a toothbrush, and Dawn dish soap, in various steps, to remove the set-in stain. I followed her steps exactly and it worked!
There was a time when I wasn't sure I wasn't doing it correctly (baking soda being rubbed into WD-40/oil stain), but apparently I was doing it right. It was just hard to tell amid the dust of baking soda all over my blouse.
I will say that I used name-brands of everything except the baking soda. WD-40 with a straw device. Check. Dawn dish soap (blue). Check. A box of baking soda and a used toothbrush. That's it!
I'm so happy to have rescued two of my favorite tops! Definitely worth a try on stubborn oil stains--even if you've already washed/dried the item multiple times.
Another win for Pinterest!
Tuesday, June 17, 2014
Monday, June 2, 2014
2014 Goals | An Update
The last two months have been about change. I bought a car, turned 40, and have recently just changed jobs. The good news is that I no longer work night shift. I am about two weeks into my new job at a cardiology clinic. No nights, no weekends, and no holidays! I do work 5 days a week which is an adjustment, but overall I expect my quality of life to improve (especially socially, physically, & emotionally).
I had hoped to do an quarterly update about how I'm doing with my 2014 goals, but alas, here it is early June...so this will have to do for a six month update.
So how am I doing with my goals?
- No fast food (alone) -- I've been 99% faithful. I snuck and got a Shamrock Shake twice during March... but I see that more as enjoying a rare dessert that just happens to come from a fast food place.
- No soda -- Been tempted, but 100% faithful.
- Trade Smart University Classes -- I started but didn't get very far. My goal is to restart classes in late July once I'm feeling more comfortable in my new job.
- Save $15K -- Well, this goal was to help facilitate the purchase of a "new" car. With rumors that my nephew would need a car this summer, I got busy and found one in April. I borrowed $$ from my parents to be able to pay cash. I bought a 2011 Honda Civic and I love it! I am still paying insurance on my old car. Not sure when the hand off will take place. For the time being its parked at my parent's house. I'm hoping to pay off my parents in August.
- Read through the Bible in a year -- 80% faithful. I did really well until early May when my birthday, a bunch of night shifts lined up tight, I went on a trip to NYC and then came back and changed jobs two weeks later... I am behind right now about 17 days. My hope is to play catch up over the next week.
- Increase MJH contribution % -- Never got around to it...new job!
- Host Pinterest Potluck x2 -- Still on my to-do list. Thinking this is another good plan for the summer.
- Camping Trip -- Still on my to-do list.
- Birthday Party/Celebration -- I had a small party at a local Indian restaurant. Due to a variety of circumstances, I decided to forgo something larger. My hope is to organize/host a scavenger hunt (and camping trip) later in the summer to extend the celebration of my 40th.
- Decrease TV/movie watching -- bleh. no progress.
- Explore Changing Churches -- I think it was February when I joined a small group...so for now I'm planning to stay connected to my Church Family--the one I've been with since 1997.
- Dating -- Still single. ha! Not going to share a whole lot here, but I'll say that I ended up rejoining one of the sites I had given up. Not sure why as I rarely go on, rarely browse. Same for the other site. Dating and getting psyched up about dating while working night shift was hard. Now that I have my evenings "free" I'm hoping more opportunities come my way. But at 40, there are fewer and fewer single people. But I still believe there are some good ones left.
- Journal Entry +1/week -- 85% faithful. Some weeks more than one entry. Other weeks none. When I'm busy, this is what falls by the wayside.
- Bible Reading Daily -- See above. This is probably what I'm most disappointed about. But I won't give up!
- Gym 2x/week and Walk 2x/week -- I estimate 65-75% faithfulness. During colder months I was pretty consistent. But I've gotten a little slack since early May. But now with new job and evenings free, I have NO EXCUSE! I've been thinking that I'd like to incorporate strength training, so I've been thinking that perhaps I'd go to alternating cardio and strength days with my weekends off. Not sure yet.
- Pinterest Project/month-- I missed my February deadline, but did two projects in March. So I'm at 100%.
- Pinterest Recipe/month -- 100% faithful. This has been surprisingly easy to do! In April and May I've done TWO new recipes a month.
- Lose 3-4 lbs/month -- No real progress here. Need a kick in the pants and maybe a gym or running partner!
Well that's it. Overall positive progress. Definitely on a good trajectory. Still time to make positive changes or progress.
Saturday, May 31, 2014
May Pinterest Project | DIY Car Trash Bag
In April I bought a 2011 Honda Civic. So when you've got these plates on your car you better show you mean it! I must say that I love the way the landscape is mirrored in the chrome in this picture.

So for May, I decided to incorporate plaid into the interior of my car by making a plaid car trash bag.

I'm not going to share the step by steps here in my blog, but will link you back to the Pinterest Pin/tutorial that inspired me. That is HERE. Below are the pros/cons to the tutorial/design and my thoughts.
Pros: Best feature, aside from the plaid, is the use of boning around the top of the trash bag. Boning is the same stuff they use around the top of the nursing drapes for breast feeding moms.
Cons: The tutorial had me using interfacing on the straps and then having to turn them right side out after sewing. Almost impossible. I ended up having to go on to YouTube to find a demonstration of some techniques. I ended up using a shish-kebab stick to help, but even that wasn't as easy as it looked on YouTube. Also the instructions were pretty vague, not a true tutorial. There was no indication of seam allowances or direction of fabric when folding. I just figured it out as I went along and made adjustments as necessary.
Thoughts: If I need to make another trash bag, I'd probably look for another pattern or tutorial. Adjustments: I end up squaring off the bottom of my bag corners (sewing triangles across the bottom on the inside), which I think looks better. Overall, I'm happy to have a plaid trash bag...and be able to check off my May project! Again I was cutting it close, so was sorta rushed.
April Pinterest Project | DIY Etching a Casserole Dish
I did get my April projects done in April...just not documented! Life has just been so crazy lately that posting has been low on the priority list.
My goal this year was to do both a Pinterest Project AND Recipe each month. But I will post separately.
Glass Etching a Casserole Dish
When I saw this on Pinterest, my first reaction was DIY etching? For real? Yazzers, people! So cool!
I went an bought the recommended etching chemical "Armour Etch" which I found at Michael's. I bought the smallest container. Very easy to use.
1. Started out by printing out name on regular printer paper in the font and size I wanted...then taped that UPSIDE DOWN onto the back of contact paper. Looking back, I'm sure I could've figured out how to have this designed/printed in mirror so that I didn't have to flip paper and try to read through the back of the paper.

2. Then came the tedious task of hand cutting the letters with an Exacto knife. Be sure to keep the small pieces that get cut out for P's, O's, R's etc... you'll use them later.

3. Then I applied the contact paper to the dish as straight as I could. This is where you'll be glad you didn't lose the "insides" of your letters. I lost the innards to my "a" and had to fake a new one. It shows.

4. Then the Armour Etch (AE) is applied liberally with a paint brush. But make sure you don't accidentally get any on any other part of the dish or other surfaces or it will "etch" there too (lesson learned). AE directions say to leave on for 5 minutes, but I left on for about an hour...just to be sure I got a good etch. Some online comments said that Pyrex was harder to etch and they felt they needed longer application.

5. Before removing the contact paper, I rinsed off the chemical (some people say you can scrape it off and put it back in the container). Then I peeled off the contact paper...and what a big smile I had on my face!
And here's the final project! As you can see the etching cream created a hazy area on the glass.

Pros: Love that you can etch this yourself. So many possibilities!
Cons: Hand-cutting out the letters is for the dogs. A lot of work for something that isn't going to be perfect.If I knew someone with a Cricut machine I would have asked them to print something out on contact paper for me.
Thoughts: Because the lettering is hand cut, it's not nearly so pristine, exact and manufactured looking as what you see on Pinterest. Those are done with a Cricut type of machine. But it's still fun to have a dish with my name on it! And I am already thinking of other glass objects that I'd like to etch. Not too surprisingly thought, I'm totally thinking about buying a Cricut machine. Not that I really have any space to store one. Heavens, I don't even have a good place to keep my sewing machine! But looking for a good deal and trying to maximize with fuel points earned on gift cards (so need to figure out WHERE I plan to buy).
Monday, March 31, 2014
March Pinterest Projects
Last night I completed two Pinterest Projects. If you recall, I missed my February deadline, so I did two projects for March.

 The blue/navy fabric is actually "lappa" fabric that I brought back from Liberia in 2008. I have tons of lappa fabrics that I'd like to find a fun use for. The zipper tag fabric is scrap plaid sheeting (what else?) that was left over from when I turned a queen flat sheet into a fitted full-size sheet (a 2013 Pinterest Project).

 This project has probably been on my Pinterest Project list for close to two years. {Side Note: I wish Pinterest attached dates to when we pinned stuff!} I have used store bought seat belt covers in the past. I'm short and seat belts just aren't friendly to the neck area! When I go on trips with my parents, I am 50/50 at remembering to pull my seat belt cover out of my car and transfer it to the other car (even tougher remember to return it). Now I shall have no excuse! THIS tutorial was so easy! Not sure why I put it off for so long! The only thing I really changed was that I used some scraps of pre-quilted fabric (batting between two layers of fabric) to replace the interfacing option. My exterior fabrics were soft enough, but not really thick and cushiony...and boy, it's pretty cushiony now!
Makeup Bag | Storage Bag {Project #1}
I was inspired by and used THIS tutorial on Pinterest. I liked the way the zipper fully opened up for easy access. For the past couple years I have used a ziploc bag to hold my smaller make-up bag and two Mary Kay compacts. Not pretty, but it worked in keeping everything together. So my hope with making this bag would be to have an attractive larger bag to hold everything.
The blue/navy fabric is actually "lappa" fabric that I brought back from Liberia in 2008. I have tons of lappa fabrics that I'd like to find a fun use for. The zipper tag fabric is scrap plaid sheeting (what else?) that was left over from when I turned a queen flat sheet into a fitted full-size sheet (a 2013 Pinterest Project).
Pros: Fairly easy tutorial to follow. Like the large zipper opening. Option to have two-tone bag and mix fabrics (which I chose not to do this time). It's washable.
Cons: Doesn't retain shape with heavy objects. My compacts fit nicely upright, but there's just not enough stiffness/sturdiness to keep it upright.
Thoughts: I made the largest size, and probably could have made a smaller size, or gone with wider corners on bottom) to allow my compact to lay on bottom, rather than side. Probably would chose a more substantial lining option to make it a bit stiffer.
Seat Belt Cover | Neck Saver {Project #2}
This project has probably been on my Pinterest Project list for close to two years. {Side Note: I wish Pinterest attached dates to when we pinned stuff!} I have used store bought seat belt covers in the past. I'm short and seat belts just aren't friendly to the neck area! When I go on trips with my parents, I am 50/50 at remembering to pull my seat belt cover out of my car and transfer it to the other car (even tougher remember to return it). Now I shall have no excuse! THIS tutorial was so easy! Not sure why I put it off for so long! The only thing I really changed was that I used some scraps of pre-quilted fabric (batting between two layers of fabric) to replace the interfacing option. My exterior fabrics were soft enough, but not really thick and cushiony...and boy, it's pretty cushiony now!
Pros: Very easy tutorial to follow. It's reversible! My interior fabric is a blue plaid (scrap left over from my 2013 place mat project last summer--which I haven't yet posted about).
Cons: Not sure yet. Will be putting it to use on my trip to NYC in early May.
Thoughts: I've already cut up fabric for three more covers (all the same) and hope to finish them today or tomorrow. The 30" package of velcro I bought is enough for four covers! I'm thinking I will offer these up to a few of the peeps driving up with me to NYC. They can try them out and if they like them, I will probably just give them away. Another thought is that I THINK these would be easily adjusted to for baby carrier straps! And they'd be so soft!! I'm hoping to buy a new-to-me car this year or next and I'll have fun choosing a coordinating fabric for a new seat belt cover!
Monday, March 17, 2014
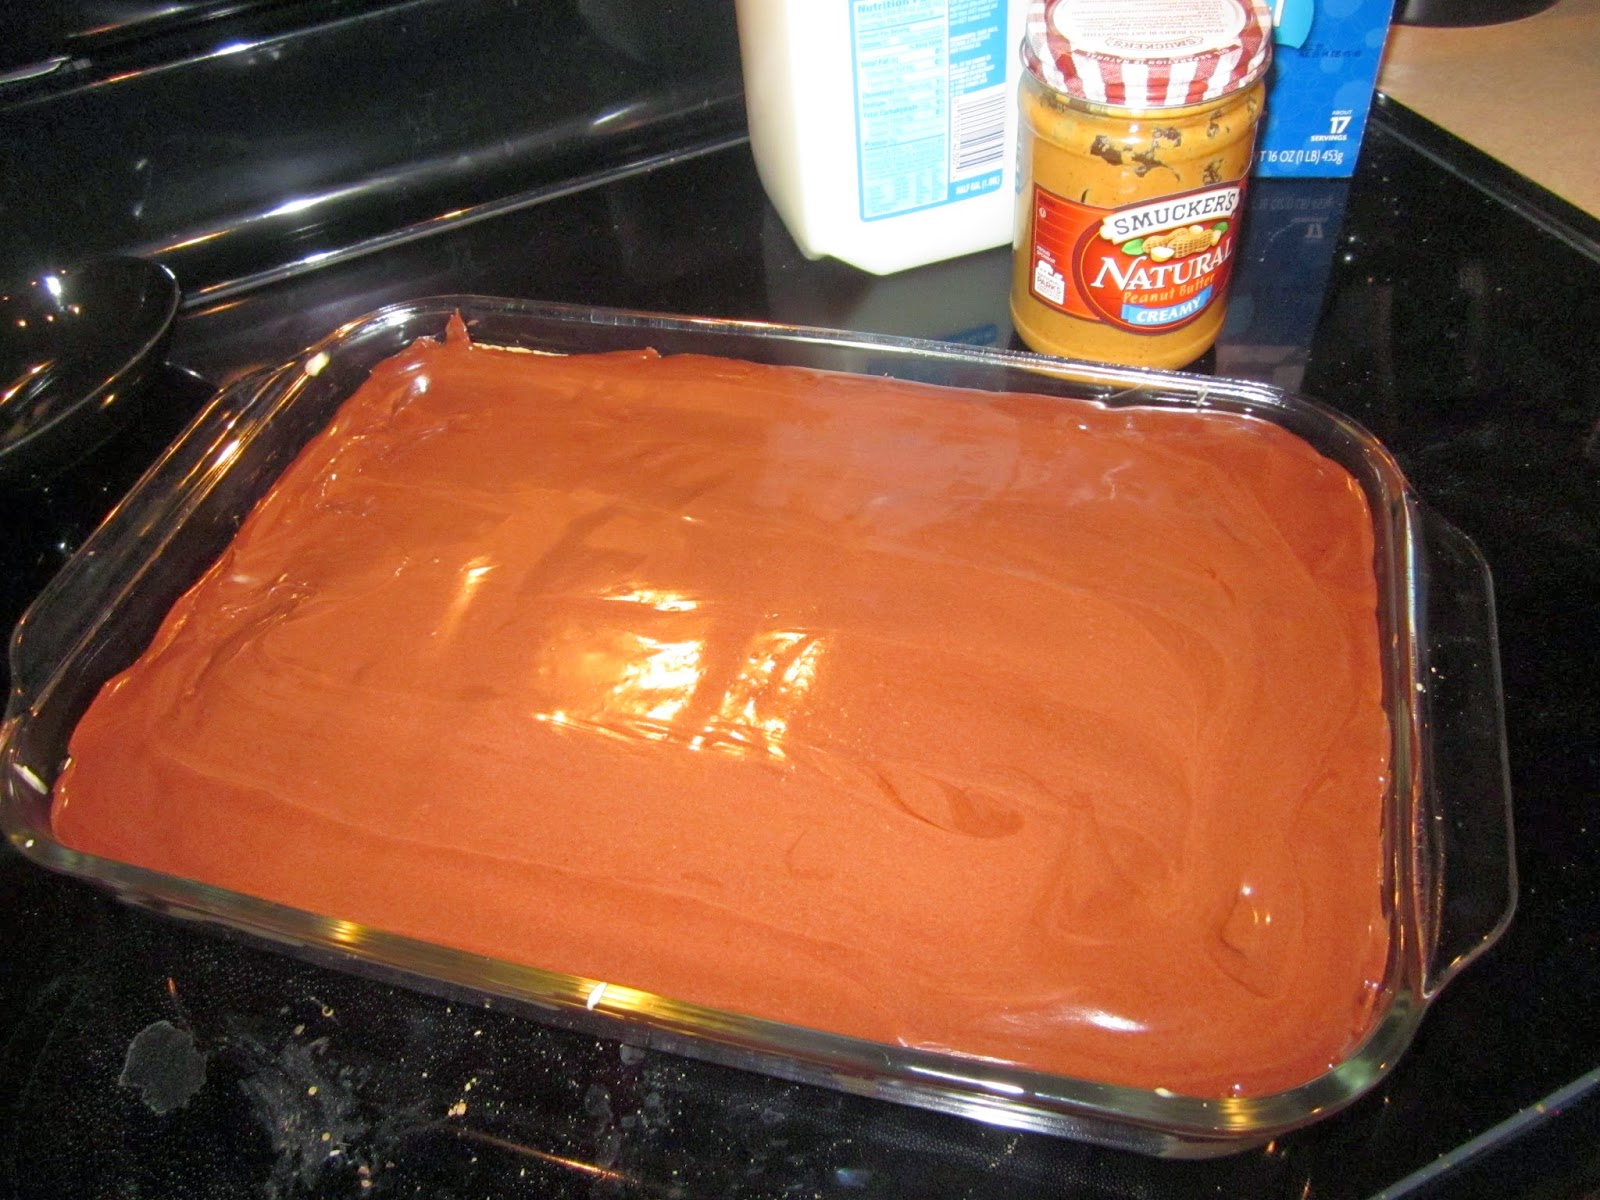
MARCH: Chocolate-Peanut Butter Éclair Dessert
So in 2014, I decided to make one Pinterest Recipe per month. This month I am making Chocolate-Peanut Butter Éclair Dessert. What's different this time is that rather than finding the recipe on Pinterest first, I am adding it to Pinterest!
One of my fellow nurses brought this in to work during Nurse's Appreciation Week last year. It was unbelievably good! You can't go wrong with PB and chocolate! I begged her for the recipe since I was unable to find one on Pinterest that I thought was close.
This is my first time making it. I am taking it to my small group Bible study tomorrow night because I'm afraid I'd eat it all myself.
 |
| Cool Whip forgotten in the photo. |
1 box Graham Crackers (you'll use most of a box)
1 large box Vanilla Pudding (5.1 oz) prepared (with milk)
1 container Chocolate Frosting
½ cup Peanut Butter (add more for more flavor)
1 container original Cool Whip
- In food processor or mixer, mix together pudding (already prepared), cool whip and peanut butter.
- Place one layer of graham crackers on bottom and sides of 9x13 in baking dish.
- Pour 1/3 of the pudding-PB mix over crackers and spread evenly.
- Repeat layering of graham crackers and pudding mix with last layer being graham crackers (I had total 4 layers of graham crackers and 3 layers pudding mix).
- Heat icing container up in microwave for a few seconds until it is melted and pour over graham crackers. I did 15 sec x 3 times being careful not to burn it. I was able to pour directly out of the container over the crackers smoothing with a spatula.
- Place in fridge and allow to cool. Tends to taste better after several hours of chilling so that graham crackers have time to get soft.

Wednesday, February 26, 2014
February Pinterest Project(s)
Well, February isn't quite over yet, but seeing as I will be working the last few nights of February, I know for certain I will not get a February Pinterest Project completed. Sigh. And to be honest, I never really figured out what I wanted to do (although I have a whole list of things to attempt) and didn't have the supplies ready (fabric chosen/purchased). I think I just procrastinated and then got busy these last two weeks of February. Plus, I recently joined a small group with my church that meets on one of my nights off, which I didn't factor into my planning in February. And my other excuse is that February's a short month. Not that that really would really have made a difference. ha ha.
So my goals is to complete TWO Pinterest Projects in March. Hopefully one in early March and one the later half. We shall see.
But I did manage to do a Pinterest Recipe for February. I've discovered recently that a number of my favorite foods contain carregeenan. It's a food additive (for dairy thickening) derived from seaweed that has scientists concerned about links to gastrointestinal diseases and possibly cancer. Where is it showing up? My favorite cottage cheese, ice cream and hot cocoa mix.
So this month, I decided to check out some DIY hot cocoa recipes on Pinterest after trying Whole Food's 365 organic hot cocoa mix and hating it (didn't like the vanilla flavoring). Trouble was that so many DIY mixes called for instant coffee creamer which, of course, contains carregeenan. Whole Foods doesn't even carry instant coffee creamer because they can't approve of the ingredients!!!
So I made THIS recipe from kitchenmeetsgirl.com. Okay flavor, but the cocoa powder makes it a little chalky going down. I'm still tinkering with it, like adding more powdered milk/sugar.
But since I attempted making my own, my mom found some hot cocoa mix at our nearby Cheese Shoppe, which is a local family-owned Amish-style bulk foods store. It was expensive, but thankfully did not list carregeenan on the label. The texture/flavor is better than the mix I made, but when it cools off just a little it gets a weird film on the top--possibly because this DRY mix uses coconut oil as a thickner??
So only one for two on my February Pinterest goals. But hopefully I'll do three for two next month. :) Until then.
So my goals is to complete TWO Pinterest Projects in March. Hopefully one in early March and one the later half. We shall see.
But I did manage to do a Pinterest Recipe for February. I've discovered recently that a number of my favorite foods contain carregeenan. It's a food additive (for dairy thickening) derived from seaweed that has scientists concerned about links to gastrointestinal diseases and possibly cancer. Where is it showing up? My favorite cottage cheese, ice cream and hot cocoa mix.
So this month, I decided to check out some DIY hot cocoa recipes on Pinterest after trying Whole Food's 365 organic hot cocoa mix and hating it (didn't like the vanilla flavoring). Trouble was that so many DIY mixes called for instant coffee creamer which, of course, contains carregeenan. Whole Foods doesn't even carry instant coffee creamer because they can't approve of the ingredients!!!
 |
| image from kitchenmeetsgirl.com/ |
But since I attempted making my own, my mom found some hot cocoa mix at our nearby Cheese Shoppe, which is a local family-owned Amish-style bulk foods store. It was expensive, but thankfully did not list carregeenan on the label. The texture/flavor is better than the mix I made, but when it cools off just a little it gets a weird film on the top--possibly because this DRY mix uses coconut oil as a thickner??
So only one for two on my February Pinterest goals. But hopefully I'll do three for two next month. :) Until then.
Subscribe to:
Posts (Atom)